-

-
Restorer Ultimate for Mac
- Contents
- Index
- Introduction to Restorer Ultimate for Mac
- Restorer Ultimate for Mac Main Panel, Settings, and Log
- Images and Regions
-
File Recovery
- Recover Files from Existing Logical Disks
- Recover Files from Deleted/Corrupted Logical Disks and Partitions
- Disk Scan
-
Data Recovery from Volume Sets and RAIDs
- Spanned Volumes, Stripe Sets, and Mirrors
- Basic RAID 4 and RAID 5
- RAID 6 Reed-Solomon Presets
- RAID6 (Double Xor) Presets
- RAIDs with Parity Delays
- Advanced RAID Layouts
- Nested and Non-Standard RAID Levels
- Finding RAID Parameters
- Checking RAID Consistency
- Syntax of a Description File for RAID Configurations
- Description Files for RAID Configurations
- Various Disk and Volume Managers
- Data Recovery over Network
- Text/Hexadecimal Editor
- Technical Information
© 2020 BitMart Inc.
All rights reserved.
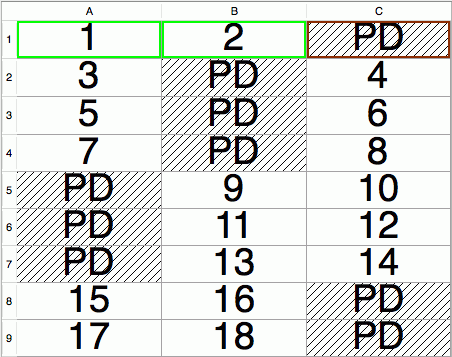
RAIDs with Parity Delays
Restorer Ultimate allows you to create RAIDs with parity delays (any level that allows that). For example, let us create a RAID 5 the parity delays with the following layout:
• Three disks,
• Delay=16
• Block size: 16 KB
• Offset: 1088 sectors (544 KB)
• Block order: Left Asynchronous (Continuous)
|
|
A |
B |
C |
Delay=16 |
|
1 |
1 |
2 |
PD |
|
|
2 |
3 |
4 |
PD |
|
|
3 |
5 |
6 |
PD |
|
|
4 |
7 |
8 |
PD |
|
|
5 |
9 |
10 |
PD |
|
|
6 |
11 |
12 |
PD |
|
|
7 |
13 |
14 |
PD |
|
|
8 |
15 |
16 |
PD |
|
|
9 |
17 |
18 |
PD |
|
|
10 |
19 |
20 |
PD |
|
|
11 |
21 |
22 |
PD |
|
|
12 |
23 |
24 |
PD |
|
|
13 |
25 |
26 |
PD |
|
|
14 |
27 |
28 |
PD |
|
|
15 |
29 |
30 |
PD |
|
|
16 |
31 |
32 |
PD |
|
|
17 |
33 |
PD |
34 |
Delay=16 |
|
18 |
35 |
PD |
36 |
|
|
19 |
37 |
PD |
38 |
|
|
20 |
39 |
PD |
40 |
|
|
21 |
41 |
PD |
42 |
|
|
22 |
43 |
PD |
44 |
|
|
23 |
45 |
PD |
46 |
|
|
24 |
47 |
PD |
48 |
|
|
25 |
49 |
PD |
50 |
|
|
26 |
51 |
PD |
52 |
|
|
27 |
53 |
PD |
54 |
|
|
28 |
55 |
PD |
56 |
|
|
29 |
57 |
PD |
58 |
|
|
30 |
59 |
PD |
60 |
|
|
31 |
61 |
PD |
62 |
|
|
32 |
63 |
PD |
64 |
|
|
33 |
PD |
65 |
66 |
Delay=16 |
|
34 |
PD |
67 |
68 |
|
|
35 |
PD |
69 |
70 |
|
|
36 |
PD |
71 |
72 |
|
|
37 |
PD |
73 |
74 |
|
|
38 |
PD |
75 |
76 |
|
|
39 |
PD |
77 |
78 |
|
|
40 |
PD |
79 |
80 |
|
|
41 |
PD |
81 |
82 |
|
|
42 |
PD |
83 |
84 |
|
|
43 |
PD |
85 |
86 |
|
|
44 |
PD |
87 |
88 |
|
|
45 |
PD |
89 |
90 |
|
|
46 |
PD |
91 |
92 |
|
|
47 |
PD |
93 |
94 |
|
|
48 |
PD |
95 |
96 |
The RAID components are the images RAID5HPDisk1.bin, RAID5HPDisk2.bin, and RAID5HPDisk3.bin on the Device/Disk list.
To create such RAID 5,
| 1 | Click Create Virtual RAID on the Task List |
| > | A Create Virtual RAID wizard will appear to guide you through the process of creating a RAID or Virtual volume set. |
| 2 | Select Virtual Block RAID Volume on the Create Virtual RAID dialog box then click the Next button |

Create Virtual RAID dialog box
| 3 | Select the required objects on the Available disks list and add them to the Selected disks list |
Specify the Offset parameter.

Create Virtual RAID dialog box
 RAID options
|
Available disks |
List of disks available for creating virtual disk arrays |
|
Show Partitions |
If this check box is selected, Restorer Ultimate also shows partitions on hard drives |
|
Show as: |
Select the units in which you want to see object sizes. You may select, Bytes , Sectors , and Bytes and Sectors . |
|
Selected disks |
List of disks selected for creating virtual disk arrays |
|
Buttons |
|
|
Add |
Click this button to add the selected disk from the Available disks list to the Selected disks list |
|
Remove |
Click this button to remove the selected disk from the Selected disks list |
|
Remove All |
Click this button to remove all selected disks from the Selected disks list |
|
Move Up |
Click this button to move the selected disk one level up in the Selected disks list |
|
Move Down |
Click this button to move the selected disk one level down in the Selected disks list |
|
Add Missing Disk |
Click this button to add a virtual disk into virtual disk array that will be created |
Note: Components should be placed in the same order and the offsets should be specified as they were in the original volume set. If this order is incorrect, you must change it by using the Move Up and Move Down buttons.
If a component from the objects is absent (due to hardware failure, for example), you can add a "missing disk" to re-construct the RAID. The missing disk should be placed in the same order as in the original RAID structure.
Turning Disks On-Line and Off-Line on-the-fly
You may turn the objects in the virtual RAID or volume set on-line and off-line by selecting/clearing the On checkbox on the Create Virtual RAID dialog box . It may be useful, for example, if you need to see which disk is non-actual in a RAID5 or 6.
Actually, when you turn an object off-line, Restorer Ultimate substitutes it with a Missing Disk or Empty Space object.
Note: Restorer Ultimate does not write anything real on the disk. A missing disk is a virtual object that does not affect actual data on the drive.
| 4 | Select RAID5 in the RAID type control on the Create Virtual RAID dialog box . |
Select Left Asynchronous (Continuous) on the Block Order field.
Specify the Block size and the Parity delay number in the Parity delay control.

Create Virtual RAID dialog box
|
By default, this parameter is set equal to Parity delay . By changing it, you may "shift" the block order table. For example, when the First parity parameter is set as 1 for the RAID 5 of 3 disks with Parity delay of 3, the block order table will be the following:
|
| Click the Finish button. |
You may automatically find parameters for RAID 5 and 6. See the Finding RAID Parameters help page for details.
| > | A Virtual volume sets and RAIDs object will appear on the Device/Disk list panel |
The Virtual volume set or RAIDs object can now be processed like regular drives/volumes.
If Restorer Ultimate detects a valid file system on the newly created RAID object, a partition object will appear on the Device/Disk list panel.
Note: You may check how correctly you have reconstructed the original volume set or RAID. Find a file and preview it. If the file appears correct, you have created a correct RAID layout. The file should be large enough. For example, it should have size equal or larger to Block size*(Number of disks-Number of parity disks) for RAID 5 or 6.
The Description Files for RAID Configurations topic shows the RAID description file for this RAID configuration.